
I’ve been extremely busy and life has felt a little chaotic. I have many projects and recipes that I want to get to, but I haven’t been able to find the time. It seems every so often I need to remind myself to make the time for the things I enjoy, because even though I’m fitting more in, it feels less chaotic to me.
I found this beautiful crystal lamp at a yard sale in the fall and immediately envisioned a gorgeous french chic lamp for my guest room. My dad insisted that I needed to rewire the lamp before using it… so dad, please pretend I already did that step.
The mismatched lampshade might have been the right fit size-wise, but definitely not style-wise. Then I was on the hunt for a lampshade. Each store I went to had something similar to what I desired, but none were quite right. One store I thought I found the right shade, but it was too big. I felt like Goldilocks and temporarily gave up on my search, after all the guest room didn’t get used too often.
Last week,I was checking the clearance racks at Target and I decided to go down the lamp aisle. I had already checked this store before, but it was like destiny – the perfect lampshade for my lamp. Goldilocks found the one that was just right.
My first step was to sand down the rusted metal piece and spray it with metallic silver Rustoleum.
I hopped over to The Graphics Fairy and printed some French Ephemera that I planned to transfer to the white lampshade. As a child, did you ever trace a picture using the window sill? Easiest way to transfer an image right? I positioned my print and taped it to the inside of the shade and turned on the light. Using a black fine-point Sharpie pen. I traced the image. Since the lamp shade was fabric, it needs to be a bleed-free. I grabbed the wrong one to start, can you guess where?
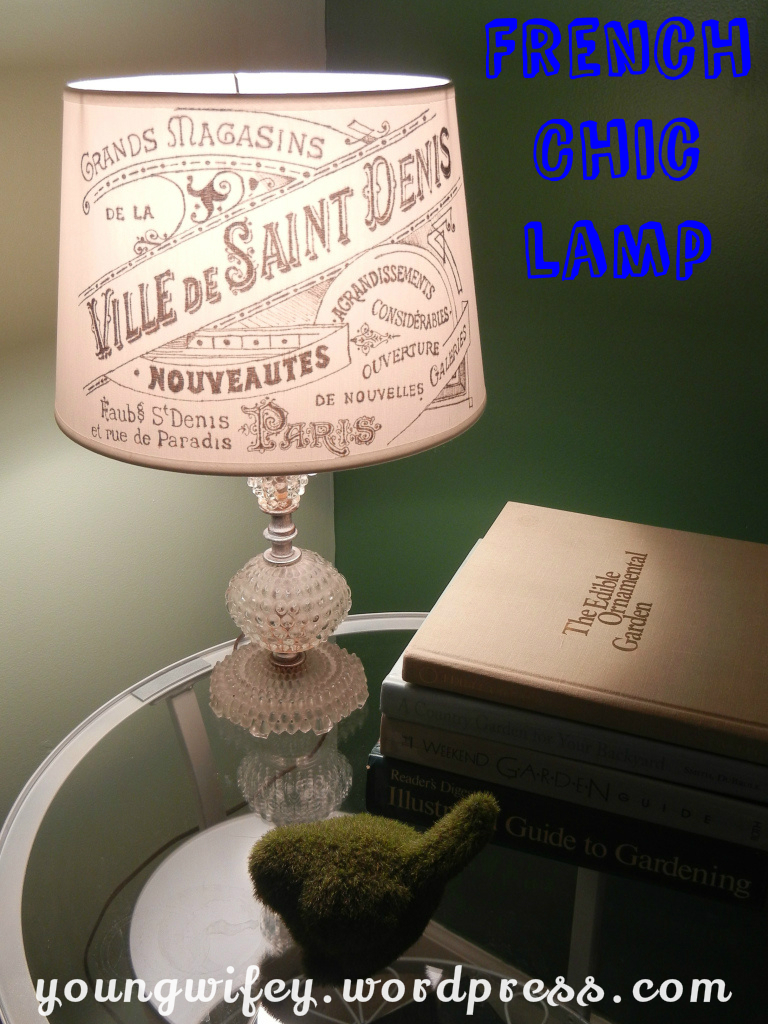 After a little TLC and craftiness, my lamp looks worlds better. It’s such a simple and quick project. Maybe you’ve seen the fairy light I’ve already made for my guest room.
What crafts or projects do you have planned for this weekend?

i have a dreams scrapbook where i design the page around the dream that i have for the day. so this weekend i will do pages about going in a hot air balloon and also going wake boarding with a friend. when i do the scrapbook i use different papers to create the best effect 🙂 yours sounds more cool 🙂 enjoy x
Sounds like you have a full weekend ahead!
I love it! So clever of you! What bleed-free marker did you end up using–it looks like it did fine lines. I might have to think of something to trace now!
It was a Sharpie Pen!
Sorry–I got confused! I thought that was the pen you started with! Silly me and my lack of comprehensive skill!
🙂 Maybe I could’ve written it better! I started with Sharpie ultra fine point marker and switched to a Sharpie ultra fine point pen!
I love this!
Thanks! ❤
Beautiful job. You are SO crafty!!!
Thanks Nancy! Now I have to design one for the other night stand!
You really are talented with this “stuff.” Never in my wildest dreams could I do any of the projects you so routinely knock off. Well done!
Thanks John!
Wow, that looks really great!
Thanks!
Totally random but have you thought of water marking your photos? They are very nice and I can see them being pinned and it seems like there has been a big kerfluffle about his lately. I love your blog. It’s so sweet!
Thanks for thinking of me Autumn. I have thought of it, but have never got for enough to learn to do it…
I know I’ve seen a million ways, next time I see it I’ll send you a link. Bet this lamp has been pinned already!!
Great! Thanks Autumn!
Beautiful work! I’m in search of a lampshade myself for similar project. Same thing I feel like nothing is quite right. Guess the hunt is half the fun. Cheers!
Thank! & good luck, I hope you have your goldilocks moments!
Im about to head out for some thrift shopping right now.
Have fun & good luck!
Ooh la la! Young Wifey, that is just stunning! You inspire me so much, I need to make a trip to Hobby Lobby this weekend!
Thank Elle! Enjoy your crafting!
tres fantastico!!!
Thanks Casey!
i just saw this on pinterest!
Did you pin it? 😛
So creative!! I love clearance finds and Target – but I love even more how you made the lampshade your own.
Thanks Courtney!
Wow! You should open up a boutique!
Haha, thanks Izzy!
Love it – very pretty! I would love for you to come by and link it up at my Inspired Creations party happening now! I would love to have you!
Stacey of Embracing Change
Thanks! I’ll have to stop on over!!!
looks absolutely wonderful – nicely done!
Thanks Amy!
Gorgeous! I adore all things French and this is no exception – thanks for sharing! I would love to have you link up again this Thursday at the Creative Inspirations party!
Stacey of Embracing Change
Thanks Stacey!
I love your lamp so much I am featuring it today – please stop by later to see! Thanks so much for linking up and please come back soon!
Stacey of Embracing Change
Awesome Stacey! XOXO
Pingback: French Chic Lamp #2 « Young Wifey's Blog
This is really beautiful! I want to try this, thanks for the inspiration!!
Thanks for your sweet words Amy! I’d love to see your finished project!
Gorgeous! Can you give us the approx. height of the shade used? I am so excited about this because I can work on it in between other doing other things. You could also make another one just for Xmas time.
Sure can, the diameter of the top is 8″, diameter of the bottom is 11″, and the height from bottom to top is 7″. Making on for Christmas! What a greta idea! I’d love to see your final project, make sure you share a photo!
This looks absolutely stunning! I’ve recently discovered the Graphics Fairy and am learning how to transfer with Mod Podge. This must have taken hours of work, I hope you’re very proud of yourself, it looks really classy. 🙂
Thanks, I am. I looooove how this turned out!
Wait! You did this with a Sharpie??
Why yes Paula, I did! 🙂
Love it! It looks terrific to me.
Thanks Korrie!
Awesome job on the lampshade!!! I’ve never heard about the windowsill idea…very cool!
Thanks Diane!
Thanks for the inspiration this is stunning! I want to make one of these for my nursery!
Thanks! I’d love to see pics!
I’m sure you must have seen it, but just in case–did you know this is featured on the Graphics Fairy page?
Thanks! I did figure it out, when I noticed all of the new comments.
i love this. you did a fantastic job YW!
Thanks Amy B!
Waooh! Seems easy enough when you tell how, but to actually do it….and without shivering is a chef-d´oeuvre! I´m duly impressed!
Haha, Thanks!
This lamp is AMAZING! I love it, as well as your adorable fairy light. Thanks for sharing your talents!
Thanks Debbie! & welcome to my blog!
I love your lamp shade! And I know it took some time and hand cramping to finish. 🙂
Just wondering what window sill tracing is all about??
♥charlotte
When we were kids and wanted to trace images, we’d tape them to the window on a sunny day, then place our paper overtop and trace the image that showed through.
Worked the same way with my lamp!
Such and awesome idea!
Thanks Hillary!
i made one for my dorm room over spring break! mine has a hot pink base. now all the girls on my floor want me to make them one!!!!!
That’s awesome Talia! I’d love to see a photo of yours and any other one you may create!
Pingback: DIY Lamp Shade Makeovers - Ideas to Make a Lamp Shade | Momcaster
Simple, sophisticated and stunning!
Thanks Elizabeth Ann!
Pingback: Happy Birthday to YWB! « Young Wifey's Blog
Awesome idea thanks! I just got two fantastic lamp shades for .75 cents and I was searching Pinterest for ways to dress them up. This is exactly what I was picturing, and now I know how to pull it off (resisting the urge to run out Sunday afternoon for the pens and get to work). Now to see if I can get a spot out of one of them, or if I need to recover them too.
Thanks! Awesome! I’d love to see pics of the finished product, share a pic of my FB page or send me a link so I can check out your crafty work!
Thank you for this great idea, Just started with my blog “Maria’s Diary” and placed a link with your tutorial, now i still have to place my pics of the lampshade i bought in the 2nd hand shop with it! I used your method for my furniture prints, long before i discovered your blog on the Graphics Fairy. When you’re in the neighbourhood, come in and have a look around! Greetings, Maria.
Thanks Maria! & Welcome! Great minds… I’ll be over soon!
Oh my gosh this is exactly what I need! Thank you!!!!
No prob! Glad you like it!
BTW, I found you through a pin from HGTV! How cool!? It was called Designer MacGyver: Impressive Sharpie Marker DIYs. 🙂
🙂
Just wanted to let you know that I featured your DIY in a Sharpie marker craft round-up on HGTV’s blog: http://blog.hgtv.com/design/2013/01/28/sharpie-marker-art-and-decor/
Hope you enjoy the mention! Your lampshade turned out beautifully. 🙂
Thank you so much! It’s a great thing to come back and see after a hiatus!!!
Pingback: DIY Lamp Shade Makeovers - Ideas to Make a Lamp Shade
This is AMAZING – so clever and beautifully done 🙂 I wish I would have found this a few months ago when I was searching for lampshade makeovers. Oh well, there are plenty more lampshades out there and I’m gonna have to try this out on one of them, although I’m doubtful it will look nearly as good as yours. Thanks!
Thank you Kate! I hope you make one, I’d love to see the pics!
Pingback: Brag Monday – French Lampshade & Whimsical Collage
Breathtakingly beautiful!
Thanks! 🙂
Pingback: 20 Gorgeous DIY Lampshades - Little Red WindowLittle Red Window
Hello–I want to use your lovely method to add an art deco border to an old floor lamp shade, but want it to be faded and subtle. Did you use a black Sharpie? How did you get the faded look of the pattern (as opposed to dark and solid)? How did you prevent the edges from being too sharp? And where does one find a non-bleeding Sharpie?
I make my own ricotta and can’t wait to try your gnocchi!
Lots of questions from Karen in Kutztown, PA: maybe we’re neighbors!
Thanks, and enjoy the snow——–Karen
Hello there fellow Pennsylvanian! 🙂 Sorry it took me so long to get back to you. I started with a Sharpie ultra fine point marker and switched to a Sharpie ultra fine point pen. I believe I picked them up at Target.The lampshade was fabric and that helps soften the edges. Just test out a small spot on your lampshade to see if your pen gives you the desired look!
Pingback: Lámparas con estilo - EL BLOG DE VIKIN / OFFICE DEPOT